目录
console简介
console 是一个用于调试和记录信息的内置对象, 提供了多种方法,可以帮助开发者输出各种信息,进行调试和分析。
console.log()
用于输出一般信息,大家应该在熟悉不过了。

console.info()
输出信息,与 console.log 类似,但在某些浏览器中可能有不同的样式。

console.warn()
输出警告信息,通常会以黄色背景或带有警告图标的样式显示。

console.error()
输出错误信息,通常会以红色背景或带有错误图标的样式显示。

console.table()
以表格形式输出数据,适用于数组和对象。
例如:
jsconst users = [
    { name: '石小石', age: 18 },
    { name: '刘亦菲', age: 18 }
];
console.table(users);

通过上述介绍,我们可以看出,原生的文本信息、警告信息、错误信息、数组信息打印出来的效果都很普通,辨识度不高!现在我们通过console.log来实现一些花里花哨的样式!
技术方案
console.log()
console.log() 可以接受任何类型的参数,包括字符串、数字、布尔值、对象、数组、函数等。最厉害的是,它支持占位符!
常用的占位符:
%s - 字符串
%d or %i - 整数
%f - 浮点数
%o - 对象
%c - CSS 样式
格式化字符串
console.log() 支持类似于 C 语言 printf 函数的格式化字符串。我们可以使用占位符来插入变量值。
jsconst name = 'Alice';
const age = 30;
console.log('Name: %s, Age: %d', name, age); // Name: Alice, Age: 30
添加样式
可以使用 %c 占位符添加 CSS 样式,使输出内容更加美观。
jsconsole.log('%c This is a styled message', 'color: red; font-size: 20px;');

自定义样式的实现,其实主要是靠%c 占位符添加 CSS 样式实现的!
实现美化的信息打印
基础信息打印
我们创建一个prettyLog方法,用于逻辑编写
js// 美化打印实现方法
const prettyLog = () => {
  const isEmpty = (value: any) => {
    return value == null || value === undefined || value === '';
  };
  const prettyPrint = (title: string, text: string, color: string) => {
    console.log(
      `%c ${title} %c ${text} %c`,
      `background:${color};border:1px solid ${color}; padding: 1px; border-radius: 2px 0 0 2px; color: #fff;`,
      `border:1px solid ${color}; padding: 1px; border-radius: 0 2px 2px 0; color: ${color};`,
      'background:transparent'
    );
  };
  // 基础信息打印
  const info = (textOrTitle: string, content = '') => {
    const title = isEmpty(content) ? 'Info' : textOrTitle;
    const text = isEmpty(content) ? textOrTitle : content;
    prettyPrint(title, text, '#909399');
  };
  return {
    info
  };
};
上述代码定义了一个 prettyLog 函数,用于美化打印信息到控制台。通过自定义样式,输出信息以更易读和美观的格式呈现。
我们使用一下看看效果
js// 创建打印对象
const log = prettyLog();

// 不带标题
log.info('这是基础信息!');

//带标题
log.info('注意看', '这是个男人叫小帅!');
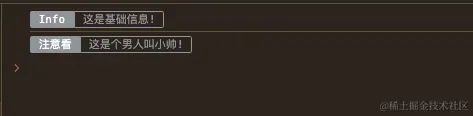
info 方法用于输出信息级别的日志。它接受两个参数:textOrTitle 和 content。如果只提供一个参数,则视为内容并设置默认标题为 Info;如果提供两个参数,则第一个参数为标题,第二个参数为内容。最后调用 prettyPrint 方法进行输出。
错误信息打印
jsconst prettyLog = () => {
    const isEmpty = (value: any) => {
        return value == null || value === undefined || value === '';
    };
    const prettyPrint = (title: string, text: string, color: string) => {
         // ...
    };
    const info = (textOrTitle: string, content = '') => {
        // ...
    };
    const error = (textOrTitle: string, content = '') => {
        const title = isEmpty(content) ? 'Error' : textOrTitle;
        const text = isEmpty(content) ? textOrTitle : content;
        prettyPrint(title, text, '#F56C6C');
    };
    // retu;
    return {
        info,
        error,
    };
};
// 创建打印对象
const log = prettyLog();

log.error('奥德彪', '出来的时候穷 生活总是让我穷 所以现在还是穷。');

log.error('前方的路看似很危险,实际一点也不安全。');

成功信息与警告信息打印
js// 美化打印实现方法
const prettyLog = () => {
    const isEmpty = (value: any) => {
        return value == null || value === undefined || value === '';
    };
    const prettyPrint = (title: string, text: string, color: string) => {
        console.log(
            `%c ${title} %c ${text} %c`,
            `background:${color};border:1px solid ${color}; padding: 1px; border-radius: 2px 0 0 2px; color: #fff;`,
            `border:1px solid ${color}; padding: 1px; border-radius: 0 2px 2px 0; color: ${color};`,
            'background:transparent'
        );
    };
    const info = (textOrTitle: string, content = '') => {
        const title = isEmpty(content) ? 'Info' : textOrTitle;
        const text = isEmpty(content) ? textOrTitle : content;
        prettyPrint(title, text, '#909399');
    };
    const error = (textOrTitle: string, content = '') => {
        const title = isEmpty(content) ? 'Error' : textOrTitle;
        const text = isEmpty(content) ? textOrTitle : content;
        prettyPrint(title, text, '#F56C6C');
    };
    const warning = (textOrTitle: string, content = '') => {
        const title = isEmpty(content) ? 'Warning' : textOrTitle;
        const text = isEmpty(content) ? textOrTitle : content;
        prettyPrint(title, text, '#E6A23C');
    };
    const success = (textOrTitle: string, content = '') => {
        const title = isEmpty(content) ? 'Success ' : textOrTitle;
        const text = isEmpty(content) ? textOrTitle : content;
        prettyPrint(title, text, '#67C23A');
    };
    // retu;
    return {
        info,
        error,
        warning,
        success
    };
};
// 创建打印对象
const log = prettyLog();

log.warning('奥德彪', '我并非无路可走 我还有死路一条! ');

log.success('奥德彪', '钱没了可以再赚,良心没了便可以赚的更多。 ');

实现图片打印
js// 美化打印实现方法
const prettyLog = () => {
  // ....
  const picture = (url: string, scale = 1) => {
    const img = new Image();
    img.crossOrigin = 'anonymous';
    img.onload = () => {
        const c = document.createElement('canvas');
        const ctx = c.getContext('2d');
        if (ctx) {
            c.width = img.width;
            c.height = img.height;
            ctx.fillStyle = 'red';
            ctx.fillRect(0, 0, c.width, c.height);
            ctx.drawImage(img, 0, 0);
            const dataUri = c.toDataURL('image/png');

            console.log(
                `%c sup?`,
                `font-size: 1px;
                padding: ${Math.floor((img.height * scale) / 2)}px ${Math.floor((img.width * scale) / 2)}px;
                background-image: url(${dataUri});
                background-repeat: no-repeat;
                background-size: ${img.width * scale}px ${img.height * scale}px;
                color: transparent;
                `
            );
        }
    };
    img.src = url;
};

  return {
    info,
    error,
    warning,
    success,
    picture
  };
}

// 创建打印对象
const log = prettyLog();

log.picture('https://nimg.ws.126.net/?url=http%3A%2F%2Fdingyue.ws.126.net%2F2024%2F0514%2Fd0ea93ebj00sdgx56001xd200u000gtg00hz00a2.jpg&thumbnail=660x2147483647&quality=80&type=jpg');

上述代码参考了其他文章:Just a moment...
url可以传支持 base64,如果是url链接,图片链接则必须开启了跨域访问才能打印
实现美化的数组打印
打印对象或者数组,其实用原生的console.table比较好
jsconst data = [
  { id: 1, name: 'Alice', age: 25 },
  { id: 2, name: 'Bob', age: 30 },
  { id: 3, name: 'Charlie', age: 35 }
];

console.table(data);

当然,我们也可以伪实现
jsconst table = () => {
    const data = [
        { id: 1, name: 'Alice', age: 25 },
        { id: 2, name: 'Bob', age: 30 },
        { id: 3, name: 'Charlie', age: 35 }
    ];
    console.log(
        '%c id%c name%c age',
        'color: white; background-color: black; padding: 2px 10px;',
        'color: white; background-color: black; padding: 2px 10px;',
        'color: white; background-color: black; padding: 2px 10px;'
    );

    data.forEach((row: any) => {
        console.log(
            `%c ${row.id} %c ${row.name} %c ${row.age} `,
            'color: black; background-color: lightgray; padding: 2px 10px;',
            'color: black; background-color: lightgray; padding: 2px 10px;',
            'color: black; background-color: lightgray; padding: 2px 10px;'
        );
    });
};

但是,我们无法控制表格的宽度,因此,这个方法不太好用,不如原生。
仅在开发环境使用
js// 美化打印实现方法
const prettyLog = () => {
  //判断是否生产环境
  const isProduction = import.meta.env.MODE === 'production';

  const isEmpty = (value: any) => {
    return value == null || value === undefined || value === '';
  };
  const prettyPrint = (title: string, text: string, color: string) => {
    if (isProduction) return;
    // ...
  };
  // ...
  const picture = (url: string, scale = 1) => {
    if (isProduction) return;
    // ...
    };

    // retu;
    return {
        info,
        error,
        warning,
        success,
        picture,
        table
    };
};
我们可以通过import.meta.env.MODE 判断当前环境是否为生产环境,在生产环境,我们可以禁用信息打印!
完整代码
js// 美化打印实现方法
const prettyLog = () => {
    const isProduction = import.meta.env.MODE === 'production';

    const isEmpty = (value: any) => {
        return value == null || value === undefined || value === '';
    };
    const prettyPrint = (title: string, text: string, color: string) => {
        if (isProduction) return;
        console.log(
            `%c ${title} %c ${text} %c`,
            `background:${color};border:1px solid ${color}; padding: 1px; border-radius: 2px 0 0 2px; color: #fff;`,
            `border:1px solid ${color}; padding: 1px; border-radius: 0 2px 2px 0; color: ${color};`,
            'background:transparent'
        );
    };
    const info = (textOrTitle: string, content = '') => {
        const title = isEmpty(content) ? 'Info' : textOrTitle;
        const text = isEmpty(content) ? textOrTitle : content;
        prettyPrint(title, text, '#909399');
    };
    const error = (textOrTitle: string, content = '') => {
        const title = isEmpty(content) ? 'Error' : textOrTitle;
        const text = isEmpty(content) ? textOrTitle : content;
        prettyPrint(title, text, '#F56C6C');
    };
    const warning = (textOrTitle: string, content = '') => {
        const title = isEmpty(content) ? 'Warning' : textOrTitle;
        const text = isEmpty(content) ? textOrTitle : content;
        prettyPrint(title, text, '#E6A23C');
    };
    const success = (textOrTitle: string, content = '') => {
        const title = isEmpty(content) ? 'Success ' : textOrTitle;
        const text = isEmpty(content) ? textOrTitle : content;
        prettyPrint(title, text, '#67C23A');
    };
    const table = () => {
        const data = [
            { id: 1, name: 'Alice', age: 25 },
            { id: 2, name: 'Bob', age: 30 },
            { id: 3, name: 'Charlie', age: 35 }
        ];
        console.log(
            '%c id%c name%c age',
            'color: white; background-color: black; padding: 2px 10px;',
            'color: white; background-color: black; padding: 2px 10px;',
            'color: white; background-color: black; padding: 2px 10px;'
        );

        data.forEach((row: any) => {
            console.log(
                `%c ${row.id} %c ${row.name} %c ${row.age} `,
                'color: black; background-color: lightgray; padding: 2px 10px;',
                'color: black; background-color: lightgray; padding: 2px 10px;',
                'color: black; background-color: lightgray; padding: 2px 10px;'
            );
        });
    };
    const picture = (url: string, scale = 1) => {
        if (isProduction) return;
        const img = new Image();
        img.crossOrigin = 'anonymous';
        img.onload = () => {
            const c = document.createElement('canvas');
            const ctx = c.getContext('2d');
            if (ctx) {
                c.width = img.width;
                c.height = img.height;
                ctx.fillStyle = 'red';
                ctx.fillRect(0, 0, c.width, c.height);
                ctx.drawImage(img, 0, 0);
                const dataUri = c.toDataURL('image/png');

                console.log(
                    `%c sup?`,
                    `font-size: 1px;
                    padding: ${Math.floor((img.height * scale) / 2)}px ${Math.floor((img.width * scale) / 2)}px;
                    background-image: url(${dataUri});
                    background-repeat: no-repeat;
                    background-size: ${img.width * scale}px ${img.height * scale}px;
                    color: transparent;
                    `
                );
            }
        };
        img.src = url;
    };

    // retu;
    return {
        info,
        error,
        warning,
        success,
        picture,
        table
    };
};
// 创建打印对象
const log = prettyLog();
本文作者:小白菜
本文链接:
版权声明:摘自《前端大全》,版权归原作者所有,仅供学习参考,禁止用于商业用途,若涉及知识产权,请联系删除。